Friday, December 22, 2017

Finish it up Friday: Garden Snails Quilt

 I finished the Garden Snails quilt top on July 31 but didn't quilt and bind it until this past week.  I was seriously scared of using my longarm on it- that's probably a post for another day.  But I recently realized that in 2017, I have made four quilt tops and quilted none of them.  I decided to just go for it- finally! 

The Garden Snails Quilt QAL was an activity on IG that I participated in, hosted by Angie at GnomeAngel.  I have finally realized that I really like participating in QAL's because there are deadlines (I really like Gretchen Rubin's 4 Tendencies framework and I am definitely an obliger) and a sense of community. 

This quilt was not easy for me even though it shouldn't have been difficult.  My big problem was that after I finally settled on a color and fabric scheme- I did the snail tails wrong and didn't realize until I had made at least 7 snails!  I am actually glad someone asked me on IG why I was making the tails so big- I hadn't caught the error myself. 
  

The fabrics I used for this quilt included: Cirrus Solids in rain for the background (a while ago I came upon an Etsy seller who was transitioning her fabric shop to a custom embroidery shop and I scored tons of Cirrus Solids fabrics for super cheap - it was AWESOME and it's my favorite fabric to use as a background in my quilts).  The other fabrics I used were a bundle of Made by Rae's Lotus Pond and a Michael Miller creamy white solid for the snail bodies.  I threw in a few other stash fabrics to mix with the Lotus Pond too. 

When I finally quilted the quilt top this past week, I aimed for "snail trails"- wavy lines with a few swirls thrown in.  I was pretty happy with how it came out!


For the backing, I had three yards of the Lotus Pond snail fabric and then I raided my blues (a fabric color I don't use as often as I should) to fill in the rest. 


The binding is a white on Navy cross-hatch from the House of Hoppington collection.  I really love it!


This is probably my last finish of 2017- it feels so good!  Linking up to Finish it up Friday at Crazy Mom Quilts

Wednesday, December 20, 2017

Swap Items Given

The main item I made for a recent swap is this Take Wing butterfly quilt.  My partner stated she wanted a mini quilt (she has quite a collection of minis hanging in her sewing room) and it took me a while to decide on a pattern/style.  It finally hit me that she likes butterflies and the ROYGBV style.  I also thought it would be fun to do this Lillyella pattern because the swap party was going to be hosted by the pattern's author, Nicole. 

I know that this quilt looks good, but dang (!)- I am just not that great at paper piecing.  I used close to a yard of the white background starry print- getting those angles to go just right does not come easily for me. 


Here's a picture of all the items I gave Melissa.  That "Teeny Tiny Nativity" is one of my favorite gifts to give: it's illustrated by a very talented modern-style artist: Helen Dardik and it's just so cute!  It's also priced just right for gift exchange parties. 

(I know this quality of this picture is not great- but I did the best I could with losing daylight and needing to get off to the party!).

Our little group of sewing friends has decided to participate in a little birthday swap this year, where we'll make and send small gifts to each other during everyone's birthday months.  Should be fun and more meaningful than doing this with a bunch of strangers.

I am definitely not very involved in attending the FRMQG (their meetings are always on Saturday morning and their meeting place keeps getting closer and closer to Denver and further from Springs) but I am glad I have found "my people" through the guild and plan to attend the spring retreat.

Friday, December 15, 2017

Tula Pink Butterfly Quilt Top Finished

Just before all my craft fair craziness started, I decided to participate in the Tula Pink Butterfly QAL, hosted by GnomeAngel.  I got a late start because I wasn't sure what color scheme to use, but finally decided on a stash pile of warm colors: pink, orange, and yellow.  I soon got derailed on the timing of the QAL because my sewing machine ended up in the shop for 3 weeks (turned out nothing was even wrong with it!).... but I eventually caught up.  

Just before the QAL ended, I was able to finish the quilt top.  I can easily say that this was the most challenging quilt I've ever pieced.  Here's why:

  • The curved blocks!  I've heard from other people that they are the. worst.  I really struggled with the smallest ones- the larger the curve, the easier it was to construct.  
  • Those curved blocks?  Make sure you make them mirror image.  I didn't.  I had to remake some of the hardest ones!
  • Fabric selection: Doing a color gradation approach was no picnic.  It definitely doesn't come natural to me, I really like high contrast in my piecing and doing that within the same color is not easy.
  • Piecing all the pieces together was not easy either.  Many readers may recall that I love my Triangulations "software" that helped me complete the 154 HST's in an afternoon.... but I found that they were a bit on the small side when I had to piece them with my other blocks.  My best guess for why this happened?  Maybe the way I cut and measure is a tad bigger than Triangulations standards.  
  • Making everything twice got old for me.  Especially if it was something challenging to piece- you "get through it," and then you have to do it again.


I really did have fun choosing fun fabrics to include in the quilt top, lots of little creature motifs and I love the use of the Brambleberry Ridge bird background fabric. 


I was one of the three winners of the QAL, so that was exciting. 

I have to admit that I am a quite scared to put this on my longarm and finish her up....  it's very intimidating to try to think of how I could custom quilt this with my limited free motion quilting skills.  It will be a while before I have the courage to put this on my machine.

Linking up to Finish it up Friday at Crazy Mom Quilts.

Thursday, December 14, 2017

Custom Order Bags

Just as the craft fairs ended, I received two requests for custom orders.  I agreed to complete them and found that I really enjoyed the projects.  It was really nice to have a guaranteed sale, rather than make something without being positive it would sell.  I also really liked being able to be creative and think outside the box a little.  

A friend from high school asked me to make her young children Christmas stockings.  I have made unique, patchwork stockings for all of my children previously and it's a fun project.  This friend gave me quite a lot of creative license to do whatever I wanted- which did feel a little intimidating- but freeing at the same time.  The only caveat she gave me was, "Don't use cutesy characters."  I'll admit that was a little bit of a challenge, because I love that cute stuff for kids.  But I am sure what I created for her will have the benefit of not being outgrown in a few years.

I used all stash fabric, mostly scraps of Brambleberry Ridge fabrics, along with some RK metallic gold linen.  I am particularly proud of the gold linen addition- I had some leftover from making some pouches for the craft fairs and it really calms the busyness of the scrappy, patchwork look.  I barely had enough for two cuffs, but I am happy I made it work.


Here's the back of the stockings:


Another custom order I completed was a result of my husband running my booth at my last craft fair.  I was only gone for about thirty minutes, but enjoyed spending time with my kids while he made sales.  A lady came by and fell in love with a dog themed pouch I had made and wondered if I could make one that featured Pugs.  One thing led to another, and eventually she decided she would buy Pug fabric locally and she brought the fabric to me.  I made a large sized pouch:


This fabric cracks me up because of the funny expressions on the dogs faces as well as the scale of the print; but I am proud to have made a really nice looking pouch and my customer was very happy.  She is gifting it to a friend who lost their pet recently.

Today, I almost took on another custom order but it didn't work out.  A lady was looking for someone to make "a zippered pillow cover with some fabric I have."  I contacted her with confidence because the type of project I thought she was talking about seemed very simple.  It turned out that she wanted someone to repair a broken invisible zipper on an existing upholstery weight couch cushion = VERY different than what she had originally stated.  I kindly declined after learning more. 

Custom work is definitely a learning experience and I am just beginning.  I'll let you know if more opportunities come along. 

Linking up to Elm Streets Bag It event.   (Stockings may be considered an unconventional item to be referred to as a "bag" but it works!   Participant guidelines state, "For this event, a bag is defined as a container made of fabric that you can put something inside."  I definitely employed several bag making techniques when making them).

Tuesday, December 12, 2017

Craft Fairs 2017: What I Made Part I

I participated in  three craft fairs this year, two on November 11 and one on December 2.  Signing up for two on one day was probably not the smartest thing I've ever done- but I did manage to pull off making enough inventory for two booths.  I sewed like a maniac.  Here's how I did it:

  • Tons of support from my husband, he did most of the cooking and helped a lot with other household chores- this isn't hugely out of the norm anyway, but I'll admit our time together in the evenings suffered.
  • My youngest started taking two naps again.  He's been taking a morning nap and an afternoon nap now for the past two months.  During his morning nap, my daughter and I often have "studio time" where she does crafts, draws, or reads to me while I sew  
  • I stopped doing a lot of things for myself.  I completely gave up Netflix, reading for pleasure, exercise on many days (I didn't give it up completely), etc.  Initially, I had a few late-nighters but quickly saw how counter productive it was and made myself quit by 10 pm.  I will admit I slacked on eating a healthful diet and "saved time" by snacking rather than having a real lunch during any of my precious hours of child-free time.  
  • I tried to not neglect important people and events.  I made time for my church responsibilities, never sewed craft fair stuff on Sundays, fully celebrated Halloween and Thanksgiving with my family, and enjoyed visits from out of town family a few times during this time period.  
  • Overall, the experience was pretty exhausting and I'll admit I *might* be a little tired of sewing right now.  But I actually think it was all worth it, and I'll explain why in my next post.
Here are some of the fruits of my labors:

Tons of gift/business/store loyalty card wallets.  I don't have pictures of all that I made.  This picture happens to represent the ones I made from just scraps.  Very satisfying to use up so many scraps but it was often time consuming to dig out the correct sizes of scraps that would coordinate together.  Eventually, I just started pulling coordinating fat quarters and made several identical ones.  These sold very well.


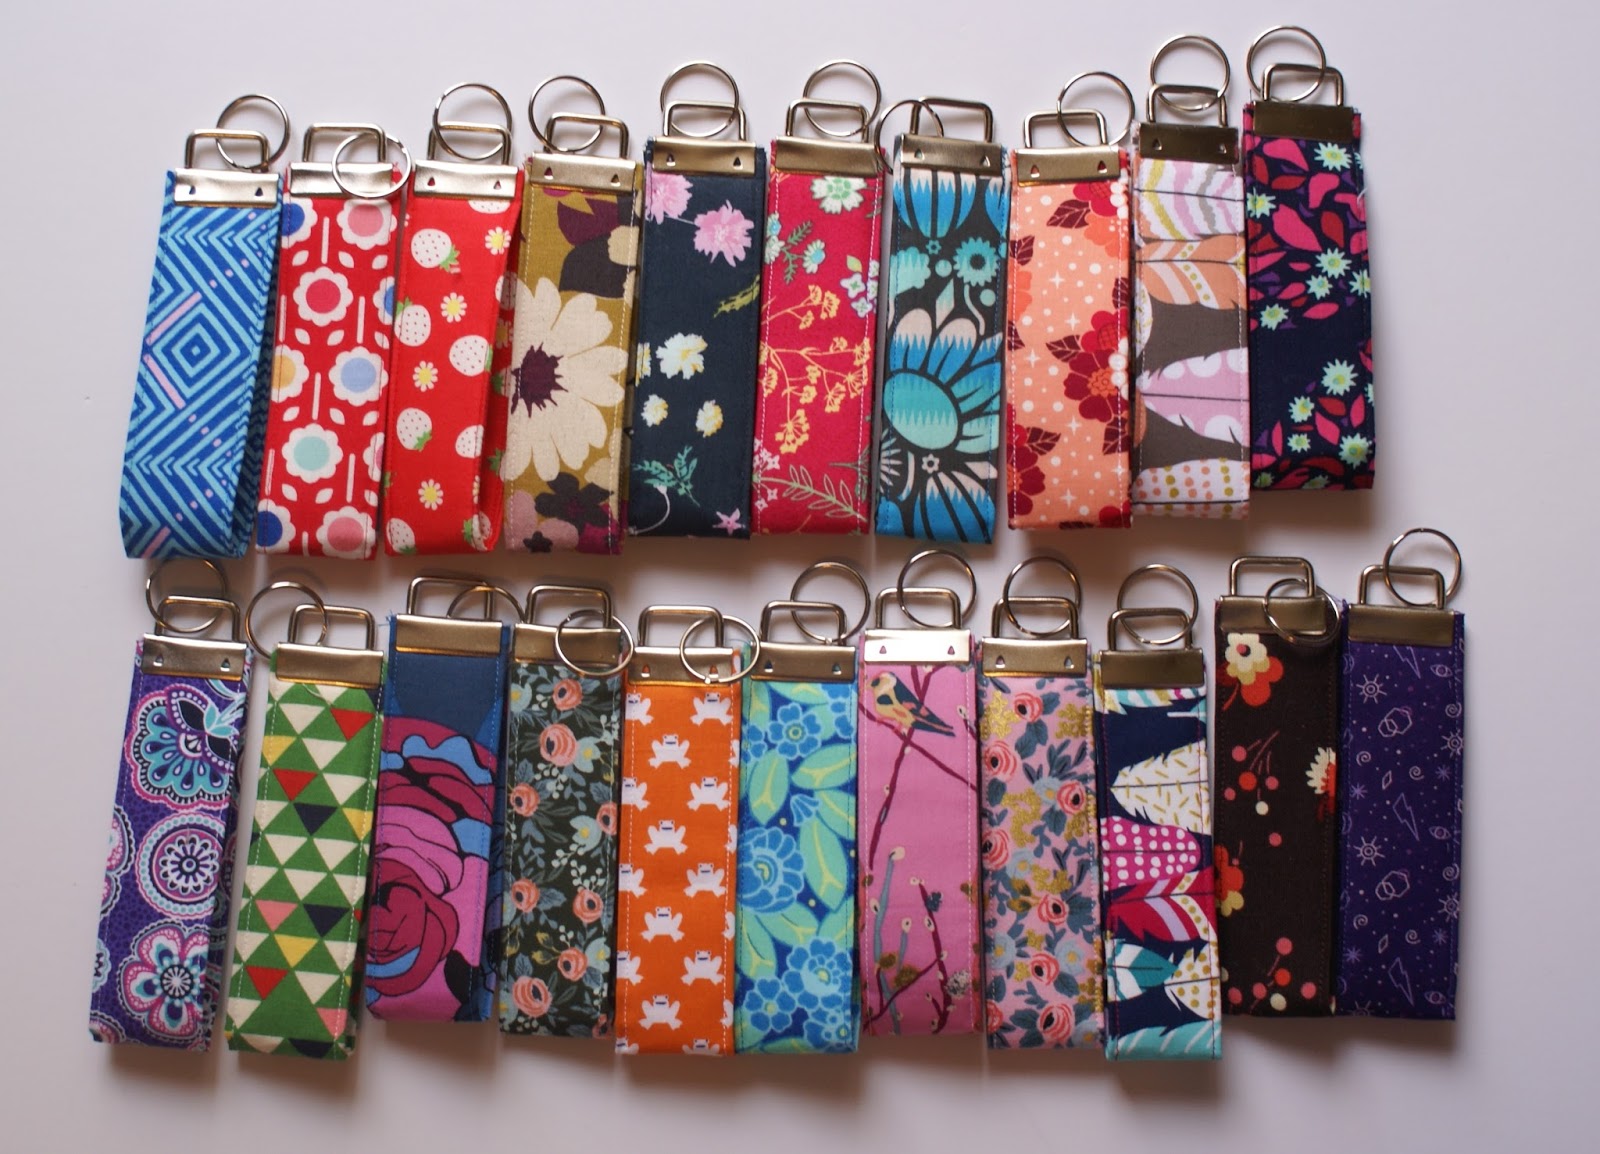
Key Fobs: These were also made from scraps.  They did not sell well at all, I sold one and gave away one.


Colored Pencil Rolls: These were very time consuming to make.  I actually made twenty-four!  It forced me to buy and learn how to use invisible thread.  They were one of my higher priced items: $22.  I sold a dozen and was happy with that. 


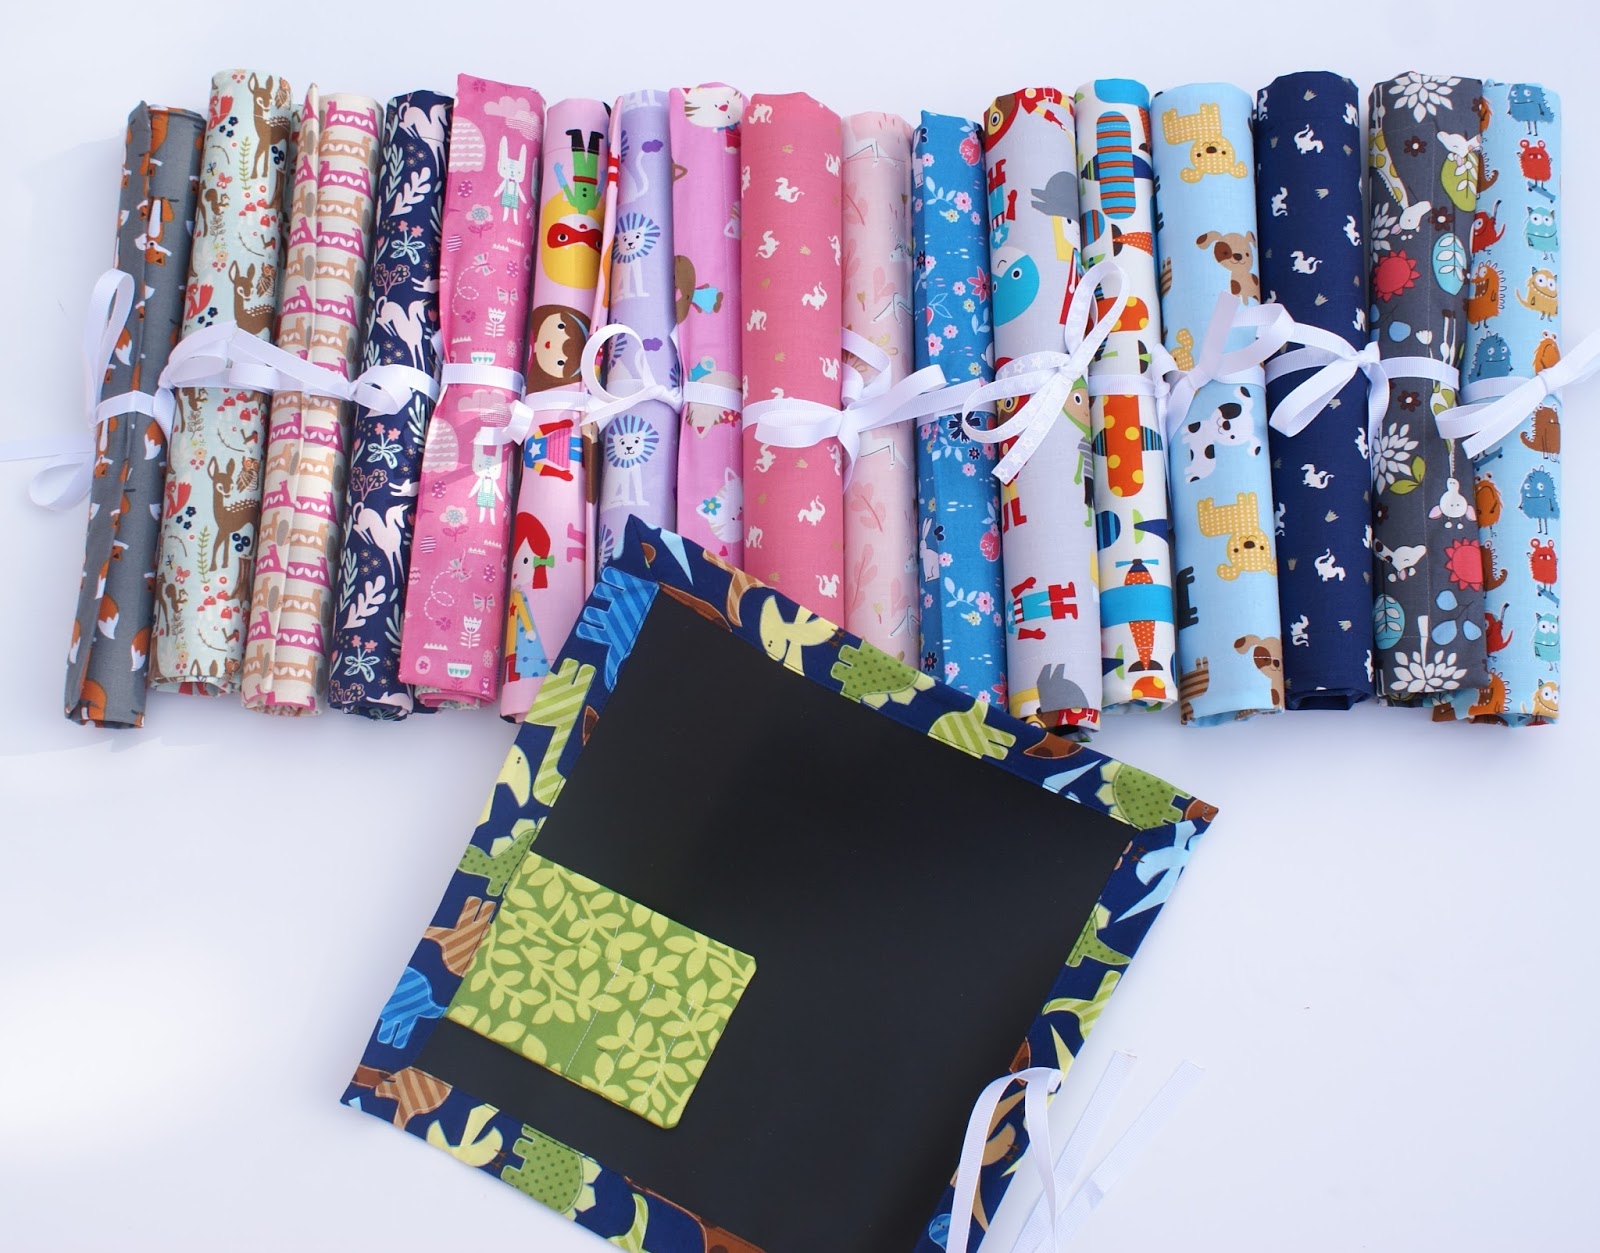
Chalkboard Rolls: This is another project that I "over cut" exterior fabrics for.  I just got into a "zone" and cut maybe 33 outer squares when I had meant to only cut 20.  After realizing my mistake, I just went with it and made tons of these.  They sold quite well at my November sales but I only sold two at my December fair. 


I really tried to go heavy on the girl designs for bibs because that was what was most popular last year.  When I was setting up my booth at the Liberty HS fair, a friend of a vendor came over and talked to me about my bibs and my taste in fabric- she was really smitten with the designs and bright colors.  Before I knew it, I had agreed to complete a custom order for her that evening!  It was a big boost of confidence for me to have basically made a sale the night before the big show.  I whipped out three bibs for her that evening and she bought them early the next morning.  She was a sweetheart, expecting a grandson soon and was excited to have a unique gift.  Overall, the bibs weren't a hug seller for me but they definitely caught a lot of people's attention.


Crayon Wallets: These sold pretty well overall, particularly the boy designs.


While sewing for the fairs, I used mostly stash fabrics but I did order a few "trendy" fabrics, like donuts, feathers, and unicorns.  Surprisingly, these weren't a big draw to people.  I sold one donut pouch and several of the gift card wallets in the feather fabrics, but I have most of that inventory left over.  I did use some of my favorite Japanese import fabrics with cat illustrations on them and had a mother daughter pair visit my booth four times, spending a total of $51 on kitty themed pouches. 


Well, this post is pretty lengthy, so I think I'll continue my craft fair thoughts and pictures in another post.  I'll share more soon!

Sunday, December 10, 2017

Fold Up Sewing Folio

 SO much to catch up on.  It's been a CRAZY 6 weeks or so since I last blogged.  I have survived three craft fairs, completed the Tula Pink Butterfly QAL, participated in a handmade Christmas present swap with guild friends, and quilted my first customer quilt on the longarm!  I actually have just two more "obligation/deadline" sewing projects to complete and then I am FREE!!!!

But I wanted to take a break this Sunday morning and share a special project I made for my swap partner: the Fold Up Sewing Folio, pattern by Aneela Hooey, found in her newest book: Stitched Sewing Organizers.

Now here's the embarrassing part about this pouch: this is the second Folio I've made because I lost the first one.  I made my swap partner a Folio right after two of my craft fairs, to give myself a little break, but also to get a head start on swap items so that I would not leave everything until the last minute....  And as the swap approached, I could not find the folio I had made!  I searched the house high and low and my husband helped me too!  It was SO frustrating and I felt like I was wasting so much time because I had so many deadlines I had to contend with.  So I finally gave in and just made another one. I still haven't found the one I lost.

Here's the outside of the pouch, made in a Menagerie floral:


And here's the inside, complete with two zippered pockets, a pincushion, wool felt pages for needles, and some pockets.

(Sorry for the blueness of the photos, I took these just a few hours before I left for the party and it was my only opportunity to take the pictures).


Making this pouch is a little time consuming but it's not that bad.  I actually made a mistake on the second pouch that I didn't make on the first: trimming down zippers to fit the project specifications is just a little tricky and you really have to pay attention to what you want the end measurement to be! 

My swap partner, Melissa, definitely seemed happy with receiving this gift.  She is undertaking the Tula Pink Nova EPP project soon, and I bet this will come in handy!

Linking up to Elm Street Quilts 2017 Bag It event.  Have a look at all the other bags being made this fall/winter.