Tuesday, July 29, 2014

Lily Dress: Briar Rose Edition

My design wall is quite empty and I have to admit that I am itching to start a major quilt project.  But it's also nice to have a break and work on smaller things.  After finishing my Jacob's Ladder top, I knew I wanted to get back to making some clothes for my two year-old daughter.  

A trip to Fancy Tiger a few weeks ago left me with these goodies: the Lily dress pattern and 1.25 yards of this Briar Rose fabric that was on sale for only $5.25 per yard.  Now, I have to admit, I kind of regret falling for that bargain because this acidic orange is not my favorite color.  In my defense, my whole family was in the car waiting for me and I was definitely in a rush!  But I guess it was good to have my first go at the pattern with a fabric I didn't love - as I was kind of nervous, through the whole process of making the dress, that the whole project would be a failure.  


Luckily this first Lily dress wasn't a failure and Charlotte loves it- she's worn it three times already:


I really had wanted to use this project as a way for me to get acquainted with my new-to-me serger, but I soon learned that the serger needle was broken.  I made the quick decision to finish the dress rather than go to Joann's for at least an hour just to buy a new needle!  (The Joann's here is insanely busy all of the time here- I try not to go to often!)

I scoured my stash for a coordinating fabric for the yoke of the dress: I wanted it to stand out and I feared that if I went with green- Charlotte would really look like a pumpkin!


One big stumbling block through making the dress was that the pattern calls for single fold bias trim to finish the neckline.  I was pretty confident that anything at Joann's would not match the red fat quarter I was working with (and I had already decided I wasn't going to use my precious sewing time to wait in a line at the store)- so luckily I made it work with the scrap I had of the yoke fabric- youtube also saved the day in teaching me how to make the trim myself.


The pattern allows you to make the dress with long sleeves or sleeveless.  I decided to eye-ball it and alter the pattern to make short sleeves.  They are a little longer than I would've liked but I think it kind of adds to the "vintage charm."  I used an old button for the back closure that really matches the design of the small flower on the yoke fabric. I really think Charlotte looks like a baby doll in this dress- I really have had people tell me that she looks like a porcelain doll with that blonde hair and her very pale skin!


I had planned to immediately make another Lily dress, with some more-loved fabric, but I had something come up that I need to attend to first. More to share soon!

Thursday, July 24, 2014

Finish it up Friday: Cross-Stitched Pillows

My sister's amazing cross-stitch pieces have started to pile up and I knew the kids would be excited if I finally made something out of them.  I decided to get them all done in one day and all that assembly line sewing kind of wore me out.  But it was worth it and has even resulted in my stubborn 2 year-old being excited to go to bed to sleep with her new pillows. 

First, I completed the Frozen pillow, using the perfect snowflake fabric from a LQS.  


The next two pillows were completed with the fun, but usually hard-to-use, rainbow fabrics from my stash:


I used pieces of leftover quilt bindings to bind the pillows and went the extra mile by making zippered backs for all of the pillows.  (I am finding that the envelope backings for previous pillows I have made aren't too hardy, especially with frequent use by children).


I can't wait to show off what my sister has been stitching me as a "late" birthday present!  Thanks for reading.  Linking up with Crazy Mom Quilt's Finish it up Friday.

Monday, July 21, 2014

Sewvivor - Dresden Lane

I've decided to throw my hat in the ring for the current round of "Sew-Vivor."  The quilted item that I feel best represents my talents is the "Birth Announcement" mini quilt I made in honor of my son.  (I apologize to long-time readers who may be sick of seeing this little quilt!)  He was born in a New England fall when all of the leaves were gorgeous colors.


I created a fiery cluster of tiny English paper pieced leaves for a tree on top of a hexagon background.  The background of hexagons consists of several favorite fabrics as well as pieces of one my favorite baby shirts he wore.


The tree and carriage were completed with needle-turn applique and elements of hand and machine embroidery were also used.  There is very minimal quilting- I simply stitched around the edges of the outer "slab" of hexagons.


The quilt measures 18 x 21 and even though it's the size of a fat quarter, it was more time intensive than a lot of the queen-sized quilts I've made.  This is my original design.  Good luck to all of the entrants!

 photo Sew-vivor3COMPETITION_zps08fe5a4f.jpg

Sunday, July 20, 2014

The Purge: Home Dec Weight Fabrics

Have you heard about "The Purge" over at Stitched in Color?  Rachel is encouraging bloggers to use up those un-loved fabric from our stash. 

I love this idea of a "purge" and want to participate.  Packing all of my fabric for a cross-country move this past February was a real eye-opener.  I gave lots of things away and tried to keep only what I thought I would use, but there is quite a bit of fabrics that aren't exactly super exciting to me anymore.  One category of fabric that is difficult for me to use is home-dec weight fabrics.  I never put the stuff in quilts, and never buy more than a yard, so they are kind of hanging around, waiting to be made into bags/purses.  So this is where I am starting with my purge: using up the heavier weight fabrics from my stash.  

My sister-in-law, Melissa, came to visit a few weeks ago and I was amazed that she was still using this purse I made her back in 2008:


I was flattered that she still had it and was using it, but I knew she was due for something new.  I had her pick through a bunch of my home dec fabrics and she chose a nice Echino fabric.  I definitely don't think this fabric exactly qualifies as an "unloved" fabric, but it definitely was overdue to be used- I am sure I've had it for years.  

Melissa chose the free Wasp Bag pattern and I had this whipped up in about two days.  It was an easy project.  I think the big horned sheep in the corner of the bag is hilarious!  (It was also funny that I scared a baby deer out of my yard when I walked to our fence to take this picture).  


Here's a picture of the back:


Bag linings are great for using up un-loved fabrics, I happily used up most of this Tufted Tweets print:


Melissa also indicated that she liked this Ikea fabric from 2007(!), so I am surprising her with a simple tote bag too:
 

It's also lined with a coordinating fabric that I am happy to finally put to good use:


the Purge

Friday, July 18, 2014

Finish it up Friday: Jacob's Ladder Quilt Top

My Jacob's Ladder quilt top is finally complete!  It's far from perfect but I am very happy with it. It's the first time in ages that I followed a pattern because I loved the design.  Usually I start with fabrics that I love and then I choose a pattern.  I had fun making this even though the blocks were so redundant; which is why I slowed down on blogging- all of the blocks kind of look the same and I didn't want to bore you guys.

The piano key border was a last minute decision after I couldn't find a suitable border fabric in my stash or online.  I really didn't want to go through all of the extra work of the piecing, but I am so glad I did.   


The top measures about twin size: 66 x 84.  I think I will start hand quilting it with pearl cotton in the fall, when the weather is a little cooler and I can enjoy having a quilt on my lap.


Having this done makes me feel so free!  My mind is racing with ideas of new projects to start.  There are so many more quilts to tackle, but I may force myself to focus on smaller projects for a while.  Linking up with Finish it up Friday.

Tuesday, July 08, 2014

Renting a Longarm: Part II: Tips and Tricks


Thanks to everyone for their kind feedback on my first post about renting a longarm. I wanted to begin this post by pointing out an important advantage to renting a longarm that I neglected to mention, but luckily Hema commented: renting a longarm is very quick compared to what you can accomplish on your domestic machine or hand quilting.  I once quilted three twin-sized quilts in one day at Laurena's - it was awesome!

To begin this post, I would like to explain the three different kinds of longarm quilting you can do when you rent a machine:

  • Free Motion: Stand in front of the machine and do the quilting.  You can use rulers, chalk, stencils, etc. to aid the quality and variety of your work 
  • Pantograph Pattern: Stand in back of the machine with a printed pattern laid out on the table, using a laser to follow the pattern on the paper.  This will result in an all-over pattern on your quilt.
  • Computerized Machine:  Choose a digitized pattern that the machine will do on its own.  You will be responsible for rolling the quilt, replacing the bobbin, and operating the software program. Lots of customization is possible with this option.
The first time I long-armed a quilt, I chose to try the Pantograph option.  I hated it!  It was so boring, I saw nothing enjoyable about guiding a laser repeatedly over some lines, and my work wasn't exactly stellar.  I thought I would never come back to the longarm studio again.  

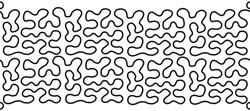
Luckily I gave longarming another chance and I tried free motion quilting.  I will admit that I stuck to stippling a lot:

10in-stipple-med.gif


I soon learned that I can stipple nicely enough and I definitely  prefer looking at my quilt to staring at a tiny laser dot!  Eventually, I ventured out to trying swirls and some free motion flowers.  My free motion skills are far from Angela Walters quality but I know I need to practice (which is why I want my own longarm someday).

It wasn't until this last year or so that I finally discovered the "Statler Stitcher" (Gammill computerized longarm).  I thought it was so fun to watch the big machine perfectly stitch out interesting patterns.  It's definitely not as "hands on" as free-motion quilting but I am in love with the precision and thousands of possibilities available in the many available digital patterns.  I've known of some people who do not enjoy "babysitting" a computerized machine and they feel too removed from the process.  I can understand this and think this feeling is especially predominant among members of modern quilt guilds.

(hopefully you can see the amazing twist on the "Baptist Fan" that the Statler did on my quilt)

I would suggest that if you are able to do so and all of these options are available to you, go ahead and try all three types of longarm quilting and see what's best for you.  I am so glad I didn't give up on longarming just because I didn't like doing a pantograph.  

So if you are considering renting a longarm, here are a few tips and pieces of advice I have for you:

  • Research all of your available rental options.  Compare classes, prices, hours of operation, convenience, and go ahead and visit the studios.  Get a feel for the "niceness" of the people who work there- I promise you don't want to quilt a quilt with someone you don't get along with.
  • Decide on what type of quilting you are going to do for your quilt and do your "homework."  If you are going to try free motion, doodle on whiteboards or scratch paper before you go.  Look at free-motion quilting books and blogs to get ideas and practice drawing them or even doing them on a quilt sandwich on your home machine.  If you're going to do a pantograph or digitized pattern, decide on that before you go.  I once spent an hour picking a pattern and that was a big, unnecessary time eater.
  • Dress comfortably and go healthy: this is when yoga pants and sneakers are okay outside of the gym.  Reschedule if you're sick.  Using a longarm is a physical process and you need to be prepared.  If you're not feeling well, you aren't likely to produce your best work.
  • Bring a lunch, water, and "something to do."  Don't rely on local businesses for a lunch break unless you're positive they will be open.  Having at least a snack and beverage available is important: you will probably spend a minimum of three hours there if you are doing a twin-sized quilt.  I recommend bringing a book or hand sewing project along because there may be interruptions to your quilting, and you might find yourself waiting for help or a repair on the machine.  It is especially possible to do something else if you are using a computerized machine- although I will admit that I liked to chat and watch the machine too much.  
  • Have a specific budget ready for your project: be generous with yourself on what you are prepared to spend.  It's hard to predict how long you will be renting the longarm but you don't want to be in there feeling panicked that you can't afford what you are doing.  This uncertainty could even effect the quality of your work if you are rushing to beat the clock.  Talk to the person at the studio/store about what you can expect with rental times, batting, and thread costs.
  • Most longarm rental places sell batting and can sell it to you by the inch- this option definitely cuts down on waste.  They usually have quite a variety of types of batting.  I almost always buy a queen sized package of Warm and Natural at Joann's for my projects because this is usually more economical but sometimes a 90 x 108 piece is  not wide enough for very large quilts.  You will have to make your decision based on your own preference and can probably research this before your longarm appointment.
Thanks for hanging in there with this long post.  Let me know if you have any questions.  I will be back soon with a newly completed quilt top to share.  Thanks for reading.

Tuesday, July 01, 2014

Renting a Longarm: Part I: The Why

I recently was asked by a blog reader if I had any advice for someone about to rent a longarm quilting machine for the first time.  I started renting a longarm regularly in 2010.  I was a regular at Laurena's Longarm Quilting in Burlington, MA and since moving to CO, I found JukeBox Quilts in Ft. Collins.  In this post, I am going to address why you might want to rent a longarm and what to look for when you are making your decision of where to go.  In my next post, I will explain what to expect and how to be prepared.

Renting a longarm is a great option for people who:
  • Actually have that service available nearby for an affordable cost
  • Want to be involved in every step of completing their quilts
  • Want to learn about long-arm quilting and gain experience
  • Want to save money quilting their quilts
  • Would like to avoiding the frustrations that often accompany quilting (big) quilts on their domestic machine
  • Are considering buying a longarm and would like to try it out first.


(Many people do not even know what a longarm quilting machine it is: here's a picture of my mom using one.  How-to-quilt.com defines it as, "a special sewing machine that is used for machine quilting a quilt. The quilt is held taut on a large frame while the machine arm moves freely allowing the operator to create a quilting design on the quilt using free motion.")

I didn't know what I was getting myself into when I stopped by Laurena's years ago.  I had my infant son with me and had driven by Laurena's studio several times- I finally got the courage to drop in.  Laurena kindly gave my son empty thread cones to play with while we talked and it wasn't long before I took her class, quilted lots of quilts at her studio, and invited her to host the Boston Modern Quilt Guild at her studio for a meeting.  Now I am addicted to making big quilts and I dream of owning a longarm someday.


I decided I wanted to rent a longarm because I do not enjoy quilting large quilts on my domestic machine.  I know that many people do it and don't complain, but I find it very unpleasant and I am not thrilled with the results.  I also do not want to pay other people to quilt my quilts for me: the first (and last time) I did that, it cost nearly $300 for a queen-sized quilt.  Although I was happy with the results, it was too expensive for our budget to do regularly.  I tend to make an average of 20 quilts per year, at least half of them are twin sized or bigger, and if I paid someone to quilt them all for me, it would be seriously costly.  I want to stay married :)  I do have a friend who is not a serious quilter but she spent several years to make a queen sized quilt top and she doesn't intend to make any more quilts.  I repeatedly urged her to just pay someone to finish it for her and start enjoying it!  If you only finish a big quilt occasionally and don't want to go through all of the hassle of finding a rental place and taking a class... just let someone else do it for you and get it done!


When I lived in MA, there were three local places where I could rent a longarm.  Two of those places were quilt/fabric stores.  I had a few friends use those locations for quilting their quilts.  For the most part, they had positive experiences and the rental costs were similar to what Laurena charged.  I preferred to frequent a longarm studio because Laurena is a full-time longarm quilter and has many years of experience.  Her focus is helping the renters with quilting their quilt.  She is not trying to answer the phone, manage employees, and cut and sell fabric.  Of course Laurena's studio had occasional distractions, but it was relatively quiet.  I have a friend that told me she once waited two hours to receive help from the owner in a shop where the longarm was having trouble.  I can't imagine!  Laurena worked so well with me: she knew getting to her shop was a struggle for me because I had to coordinate childcare- she always let me come early and stay late if I needed to.  


Anyway, finding a longarm rental place can be a challenge: these types of businesses are not extremely common.  You may not have the luxury of being able to choose between someone who is a dedicated longarmer and someone who has a machine in their fabric shop.  I actually decided to drive two hours north to Ft. Collins rather than rent within a store 10 minutes from me mainly because that shop charges $150 for a class to even be able to rent the machine.  They won't consider opting me out of the class despite my having logged 50+ hours on a machine previously.  


So I think it might be helpful to explain why renting a longarm is more affordable than paying someone else to quilt your quilt for you.  I was pretty frank with Laurena that sometimes I just wanted to get the three layers of a quilt together and I wanted the most affordable method to accomplish this.  She sat down with a calculator and we did the math: if I spent 4 hours in her studio quilting a quilt, it would cost $70, if I had her quilt it for me, based on the square inches (width x height), it would cost $140.  To be fair, there is an obvious difference here, and it's not just in price.  I may have been happier with Laurena's quilting, than my own- you are paying for someone's expertise.  You definitely have to weigh your options and decide what's most important to you.

Just as an FYI, as I know this information can be hard to find, here are the approximations of costs for renting longarms that I have encountered:

  • At Laurena's, she required that you take a 3 hour, $50 class to be able to rent her machines.  Rental time was $17.50 per hour and later changed to $20.  She also offered a frequent rental program where you would get 4 free hours of quilting for every 20 hours you completed.  She also used to discount $2.50 per hour if you stayed more than 4 hours.  She did not charge for thread.  She was also generous enough to purchase Statler (computerized patterns) with a modern appeal if I couldn't find something I liked from what she already had.  (I have heard some of her policies have changed since I moved).
  • At JukeBox, they do not require customers to take a class.  They charge $15 per hour to do free-motion or pantograph work, and $25 per hour for the computerized machines.  They charge a nominal thread fee- mine was $3.  They also gave out coupons periodically and I received 20% off on the quilt I quilted there.  
  • Most of the queen-king sized quilts I have quilted on my own have cost me about $80 a piece.
In my next post on this topic, I will discuss the different types of longarm quilting you can do and how to be prepared for your visit.  If you have anything to add or questions for me, please comment!  I hope this topic has been interesting/helpful.